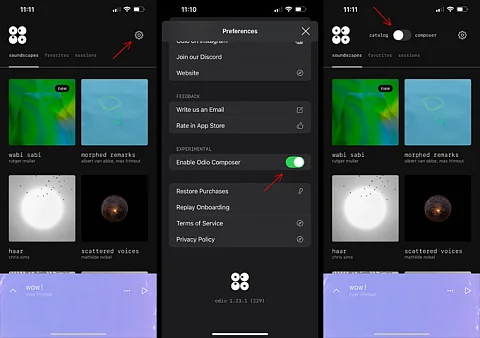
We’re excited to announce that Odio Composer is almost ready to launch out of beta for all our supporting members! Since many artists and listeners are already exploring Composer, and even more of you have shown interest, we’ve put together this quick tutorial to help you activate Composer beta in the app and get started creating your own spatial soundscapes.
How to enable composer?
Activating Composer is quick and easy. Here’s how:
- Tap the little gear icon in the main view to open the Preferences sheet.
- Scroll down until you see “Enable Composer Mode” and toggle it on.
- Boom—you’re all set! At the top of the main view, you’ll now see a toggle to switch between Catalog and Composer.

Creating a new Composer project
Once you’ve switched to Composer mode, you’ll see a square with a “+” inside it. Tap on it, and voila—you’ve just created your first project!
Creating an Odio soundscape
Within your project, you can craft new soundscapes by importing or recording sounds.
Importing sounds
Odio Composer gives you two easy ways to add sounds:
1. Recording sounds
Record sounds directly within the app! Note that all recorded sounds are in mono.
2. Importing sounds
Import audio files directly from your iCloud Drive.
Multichannel sound walls
If you import multichannel audio files, Odio Composer lets you create sound walls. This feature allows your sounds to have a specific width. Odio automatically detects multichannel audio and lets you set the width in degrees, forming an arc around you on the Odio soundscape stage.
Spatially arranging your soundscape
In the soundscape view, you can arrange your imported or recorded sounds on the Odio soundscape stage.
Exporting and sharing your project
Once you’re happy with your soundscapes, you can export the project and share it with fellow listeners.


